Knowledge Ark build sheet · Knowledge Ark · Culture Ark · An Artificial Mind Hive project by Austin Little
A printing press is a machine for making the same marks on paper again and again, quickly and exactly. Ink a raised surface, lay paper on it, press evenly, peel the paper away: that is the whole process. Repeated a few hundred times a day, it turned books from rare handwritten objects into things ordinary people could own, and it carried laws, maps, recipes, medicine, news and arguments further and faster than anything before it. This sheet explains where printing came from, from woodblocks in Tang China to steam presses in London, how relief printing works, what each part of a press does, and how to build a working tabletop screw press from timber and a threaded rod, with carved blocks and oil-based ink. Everything here is meant to be rebuilt from scratch if it ever had to be.
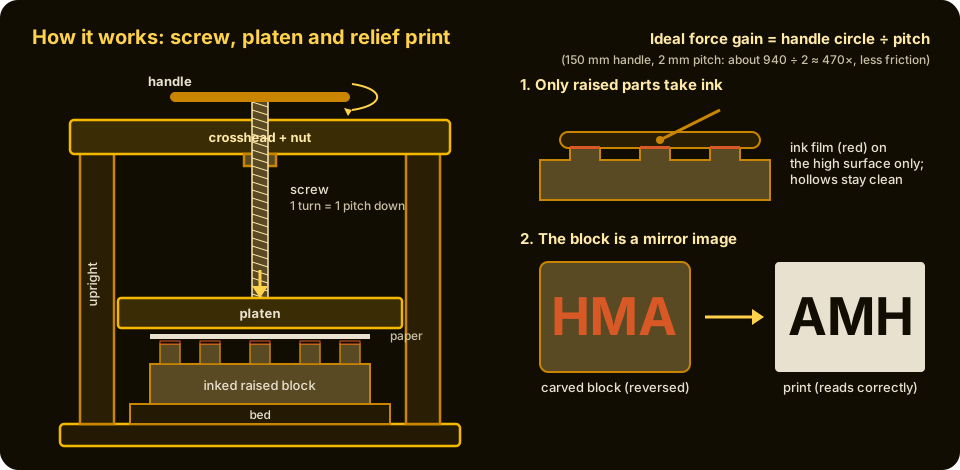
The press and the print. Left: the screw turns rotation into a strong, straight push, and the flat platen spreads it evenly over the paper. Right: only the raised parts of the block take ink. The block is carved as a mirror image, so the print reads the right way round.
Why keep this in the Knowledge Ark
Writing lets knowledge outlive the person who has it. Printing lets it outlive the copy. A single manuscript can burn, rot or be lost; five hundred printed copies scattered across a region almost certainly will not all be. A small press can make notices, forms, labels, teaching sheets, maps, songbooks and books, and it needs no electricity. It also teaches useful principles: how a screw or lever multiplies force, why a flat surface must meet a flat surface evenly, how ink behaves, and why a mirror image is needed. And printing is one of the clearest examples in history of a technology changing how people think: the spread of printed books in Europe after the 1450s fed the Renaissance, the Reformation and the scientific revolution, and in East Asia woodblock printing had already made books common centuries earlier.
History: how it came about
Seals, rubbings and stamps
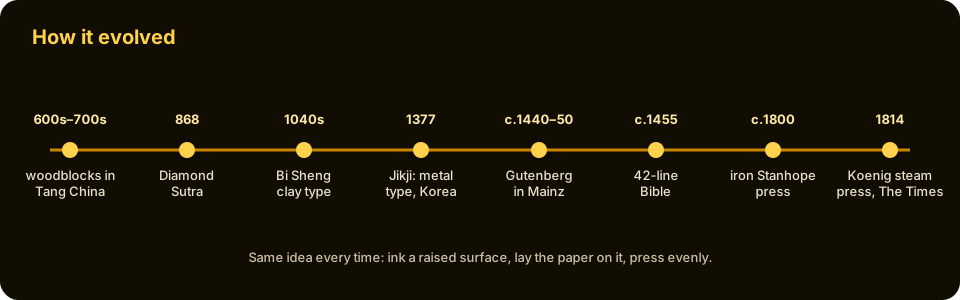
Long before printing on paper, people pressed carved surfaces into soft materials. Cylinder seals rolled across wet clay in Mesopotamia from the fourth millennium BCE, and stamped seals were used across the ancient world to mark ownership. In China, carved seals were inked and stamped on silk and paper, and texts carved in stone were copied by rubbing: damp paper laid over the inscription, then dabbed with ink so the carved letters stayed white. Paper itself was developed in China; the court official Cai Lun is credited in Chinese histories with improving papermaking in 105 CE. Seals, rubbing and paper together contained everything needed for printing except the idea of carving a whole page to be inked and printed many times.
Woodblock printing in East Asia
By the seventh and eighth centuries, during the Tang dynasty, Chinese printers were doing exactly that. A text was written out on thin paper, laid face down on a smooth block of fine-grained wood such as pear or jujube, and the wood around the characters was cut away, leaving the writing raised and reversed. The block was brushed with water-based ink, a sheet of paper laid on it, and the back of the paper rubbed with a dry brush or pad. No press was needed. One block could print thousands of sheets. Among the oldest surviving prints is a Buddhist dharani charm scroll found in 1966 inside the Seokgatap pagoda at Bulguksa temple in Gyeongju, Korea; the pagoda was completed in 751, so the scroll is at least that old. In Japan, between 764 and 770, Empress Shōtoku ordered one million small printed charms to be placed in miniature wooden pagodas, and many survive.
868: the Diamond Sutra
The oldest complete printed book that carries a date is a copy of the Diamond Sutra, a Buddhist scripture, printed as a scroll a little over five metres long from several woodblocks pasted together. Its closing note says it was made for free distribution by a man named Wang Jie on behalf of his parents, and gives a date that corresponds to 11 May 868. The scroll begins with a finely cut picture of the Buddha teaching, which shows how skilled block cutters already were. It was sealed with thousands of other manuscripts in a cave at the Mogao Grottoes near Dunhuang, in north-west China, around the early eleventh century, discovered by the monk Wang Yuanlu in 1900, and acquired by the explorer Aurel Stein in 1907. It is now in the British Library in London.
1040s: Bi Sheng and movable clay type
Carving a whole block for every page is slow, and a mistake ruins the block. Between about 1041 and 1048, a commoner named Bi Sheng invented movable type: one small piece for each character, so the pieces could be set, printed and then reused for another text. He made his type from clay, carved each character on the end of a small piece, and hardened the pieces by fire. To print, he set the type in an iron frame on an iron plate coated with a mixture of pine resin, wax and paper ash, warmed the plate to soften the mixture, pressed the type flat with a board and let it cool so the type was held firm. Using two plates, one could be printed while the next was being set. The scholar Shen Kuo described the method in his book Dream Pool Essays, written around 1088, which is why we know of it. Later Chinese printers tried wood, tin and bronze type; the official Wang Zhen made over 60,000 wooden type pieces in the 1290s and set them out on revolving tables to make finding characters easier. Because written Chinese uses thousands of different characters, woodblocks remained the main way of printing in China until the nineteenth century, but movable type had been proven.
1377: the Jikji and Korean metal type
Korean printers in the Goryeo dynasty took the next step: type cast in metal. Metal type is far more durable than clay and gives sharper, more even letters. Records describe metal type being used in Korea by the thirteenth century, but the oldest surviving book printed with movable metal type is the Jikji, a collection of Buddhist teachings, printed at Heungdeok Temple in Cheongju in 1377. Only the second of its two volumes survives, held at the Bibliothèque nationale de France in Paris, and in 2001 UNESCO added it to its Memory of the World register. In 1403 the Joseon court founded a type foundry, and Korean royal printers produced large editions with cast bronze type through the fifteenth century. The Korean alphabet, Hangul, announced by King Sejong in 1446, would later make movable type even more practical, since it needs only a small set of letters.
c. 1440–1450: Gutenberg in Mainz
In Europe, block-printed playing cards and religious images were in use by the early fifteenth century, but books were still copied by hand. Johannes Gutenberg, a goldsmith from Mainz, began experimenting with printing in Strasbourg in the late 1430s, as records of a 1439 lawsuit there show, and by about 1450 he had a working printing shop in Mainz, financed by loans from the merchant Johann Fust. Gutenberg's achievement was a complete system, not one invention. He developed an adjustable hand mould in which a craftsman could cast large numbers of identical letters quickly from metal matrices struck by hardened steel punches; a type metal based on lead that melted easily and set hard; an oil-based ink that would stick to metal type; and a press adapted from the screw presses already used for pressing grapes, olives and paper, which pressed the paper flat and evenly onto the type.
c. 1455: the 42-line Bible
The great product of Gutenberg's shop was a Latin Bible set in two columns of 42 lines per page, nearly 1,300 pages in all, usually bound in two volumes. It was finished by about 1455. In a letter of March 1455, the churchman Enea Silvio Piccolomini, later Pope Pius II, wrote that he had seen sections of it at Frankfurt the year before and that the script was very clean and easy to read. Around 180 copies are thought to have been printed, some on paper and some on vellum; about 49 survive, some of them incomplete. Gutenberg lost his business to Fust in a lawsuit in 1455, and Fust and his partner Peter Schöffer went on to print the Mainz Psalter in 1457, the first European book to carry a printed date and the printers' names. Gutenberg died in 1468. Printing spread with astonishing speed: by 1500 printing shops were working in more than two hundred towns across Europe, and the books printed before that date, known as incunabula, run to tens of thousands of editions.
c. 1800: the iron Stanhope press
For three and a half centuries the hand press changed little. It was a wooden frame with a big screw, a platen and a sliding bed, worked by two men, one inking and one pulling the bar. Around 1800 Charles Stanhope, third Earl Stanhope, built an all-iron press. Its cast-iron frame was far stiffer than wood, and a set of linked levers between the bar and the screw gave great pressure at the end of the pull. The platen was large enough to print a whole sheet in one pull, where wooden presses often needed two. Other iron hand presses followed, including the Columbian press of George Clymer of Philadelphia, made from around 1813 and famous for the cast eagle on top that serves as a counterweight, and the Albion press of R. W. Cope in London, from the early 1820s. Many of them are still printing in workshops today.
1814: Koenig's steam press
The real leap in speed came from leaving the flat platen behind. The German printer Friedrich Koenig, working in London with the engineer Andreas Bauer, built a press in which a revolving cylinder rolled the paper over the type bed and the inking was done by rollers, all driven by a steam engine. On 29 November 1814 The Times of London was printed on Koenig's steam-powered press, and the paper announced to its readers that it had been printed by machinery at about 1,100 sheets an hour, several times what a hand-press crew could manage. Through the nineteenth century came rotary presses printing from curved plates on continuous rolls of paper, typesetting machines such as Ottmar Mergenthaler's Linotype of 1886, and offset lithography in the early twentieth century. Cheap newspapers, school books and mass literacy followed. Yet the principle of the simplest relief print, ink on a raised surface pressed onto paper, is unchanged.
How it works
Relief printing
There are several families of printing. In relief printing the image stands up from the surface; ink is rolled across the top and only the raised parts take it. Woodblocks, metal type, linocuts and rubber stamps are all relief. In intaglio printing, such as engraving, the image is cut into the surface and ink is held in the grooves. In planographic printing, such as lithography, the surface is flat and greasy ink sticks only to chemically treated areas. This sheet is about relief printing, because it needs the simplest tools and the simplest press.
The mirror image
When paper is pressed face down onto a block, left and right swap. A block must therefore be carved, or type set, as a mirror image. Letters in a line of metal type look backwards when you read them in the composing stick; printers learned to read them that way. For a home-made block, draw the design on paper, then transfer it reversed onto the block, and check it in a mirror before cutting.
Ink
Ink for relief printing must be thick and tacky, so that a thin, even film sits on top of the raised surface without flooding into the hollows. East Asian printers used water-based ink made from soot and glue, which works well on wood and absorbent paper but beads up on metal. Gutenberg's oil-based ink, made like an oil paint from soot or lampblack ground into a varnish of boiled linseed oil, clung to metal type and dried hard. Modern relief inks are still oil-based or made to behave like it. Ink is rolled out on a smooth slab of glass or stone with a rubber roller called a brayer until it forms an even, velvety film, then rolled onto the block. Early printers dabbed ink on with leather ink balls stuffed with wool or horsehair; composition rollers replaced them in the early nineteenth century.
Even pressure
Rubbing the back of the paper by hand, as East Asian printers did, works well on a single block and thin paper. A press does better on a larger area, thicker paper or metal type, because it presses the whole surface at once with steady, even force. The secret is two flat, parallel surfaces: the bed, which holds the type or block, and the platen, which presses down on the paper. If either surface is warped or they are not parallel, one part of the print will be heavy and another faint.
How the screw multiplies force
A screw is a ramp wrapped around a rod. Each full turn of the handle moves the screw down by one pitch, the distance between its threads. The handle's end travels around a circle many times larger than that. In an ideal screw with no friction, the force is multiplied by the ratio of those distances: the circumference of the handle's circle divided by the pitch. A handle 150 mm from the centre travels about 940 mm per turn; on a screw with a 2 mm pitch the ideal multiplication is about 470 times. Real screws lose much of this to friction in the threads, but even a fraction of it is far more than the push needed to print a small block. The final squeeze happens in the last fraction of a turn, once the platen has met the paper.
Packing and the tympan
Paper is never perfectly flat and neither are blocks. Printers put a few sheets of paper or thin card between the platen and the printing sheet, called packing. On a hand press the packing sits in the tympan, a hinged frame covered with parchment or cloth, onto which each sheet is placed. Adding or removing a sheet of packing raises or lowers the pressure. The frisket, a second hinged frame covered with paper with a window cut where the print should go, folds down over the sheet to hold it and to keep ink on the margins of the type and furniture off the paper. Tympan and frisket fold down together onto the forme, the bed slides under the platen, the bar is pulled, and the bed slides back out.
Locking up the forme
Loose type or a block must not move while it is inked and pressed. The type is surrounded by blocks of wood or metal called furniture and tightened inside a rigid iron frame called the chase by wedges or expanding devices called quoins. The locked-up chase, with its type, is called the forme. For a single carved block on a small press, a simple wooden frame with a wedge does the same job.
Type height
Every piece of type and every block in a forme must be exactly the same height, or the high pieces print heavily and the low ones not at all. In Britain and the United States the standard type height became 0.918 inch, about 23.3 mm. For a home-made press with an adjustable screw, the exact height matters less than every part of the forme matching.
Parts and what each one does
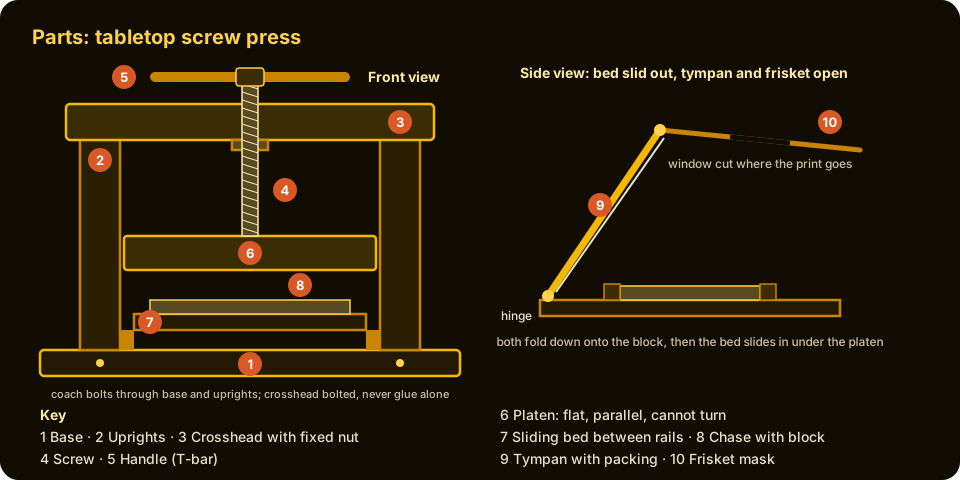
- Base. The heavy, flat board that everything stands on. It takes the downward force of every print.
- Uprights. Two strong posts that carry the crosshead and guide the platen. Every pull tries to tear them away from the base, so they must be bolted, not just glued.
- Crosshead and nut. The top beam, fitted with a nut through which the screw turns. It takes the upward reaction to every print.
- Screw. The threaded rod that converts turning into a straight downward push.
- Handle. A bar through the top of the screw. Longer means more force but more room to swing.
- Platen. The flat block on the end of the screw that presses the paper. It must be flat, parallel to the bed and prevented from turning.
- Bed (carriage). A flat sliding board that carries the forme in and out under the platen, so it can be inked and the paper changed without reaching under the screw.
- Chase with block or type. The frame that holds the printing surface locked up firmly with furniture and a wedge or quoin.
- Tympan with packing. The hinged frame onto which the paper is laid and which holds the packing sheets.
- Frisket. The hinged paper mask that holds the sheet and keeps the margins clean.
Build it: a tabletop screw press
This build makes a small screw press that prints an area of up to about 200 × 150 mm, enough for postcards, notices, small posters in sections, book pages and bookplates. It uses relief blocks carved from linoleum or wood. A simpler alternative is described at the end.
Materials
- Base: 18 mm plywood, 450 × 300 mm. Two layers glued together make it heavier and stiffer.
- Uprights: two pieces of hardwood or straight softwood 45 × 70 mm, 380 mm long.
- Crosshead: one piece of hardwood 45 × 95 mm, 360 mm long. Oak, beech, ash or maple are best.
- Screw: a steel threaded rod 16 mm in diameter, about 300 mm long, with three matching nuts and large washers. A trapezoidal leadscrew (for example Tr16 × 4) with its flanged nut is better, because its square-shouldered threads are stronger and smoother; an old bench-vice or bookbinding-press screw is better still.
- Nut plate: a steel plate about 80 × 80 × 5 mm drilled for the screw's nut and for four bolts, or a flanged leadscrew nut.
- Platen: two layers of 18 mm plywood glued together, 258 × 180 mm (the uprights stand about 262 mm apart inside), faced with 3 mm hardboard or aluminium sheet, plus a 60 × 60 × 5 mm steel plate for the screw to push on.
- Bed: 18 mm plywood 300 × 220 mm, with two hardwood rails 20 × 20 mm along the base for it to slide between and a stop block at the back.
- Tympan and frisket: two light frames of 12 × 20 mm wood, 260 × 200 mm, with small hinges; heavy drawing paper or thin card for the tympan sheet and frisket mask.
- Fixings: four 10 mm coach bolts 120 mm long with nuts and washers for the uprights, four 8 mm bolts for the crosshead, wood glue, screws.
- Handle: a steel bar or hardwood dowel 25 mm × 300 mm, with a 16 mm coupling nut drilled through to take it, or a T-handle welded to a nut.
- Printing: linoleum or soft-cut printing block about 3 mm thick, or a smooth, fine-grained hardwood board such as cherry, pear, lime or basswood; lino-cutting tools with V and U gouges; oil-based relief printing ink; a rubber brayer about 100 mm wide; a sheet of thick glass about 300 × 300 mm with taped edges; smooth paper.
Tools
Saw, drill with bits from 6 to 18 mm, spanners, square, ruler, clamps, file, sandpaper, a bench hook for carving, and a mirror.
Step 1: base and bed rails
Glue two layers of plywood together for the base and weight them flat until dry. Glue and screw the two bed rails along the base, parallel, 222 mm apart, so the bed slides between them freely but without side play. Fix a stop block across the back so the bed always stops in the same place, centred under where the platen will be.
Step 2: uprights
Stand the uprights on the base, one each side just outside the bed rails, centred front to back. Drill two 10 mm holes through each upright's foot and the base, and fix them with coach bolts, washers and nuts, plus glue. The holes in the base should be countersunk underneath so the base sits flat on the table. Check that both uprights are exactly vertical in both directions.
Step 3: crosshead and nut
Drill an 18 mm clearance hole through the centre of the crosshead. Bolt the steel nut plate (or the flanged leadscrew nut) to the underside of the crosshead, centred on the hole, with its nut welded or held captive so it cannot turn. Then fix the crosshead on top of the uprights with two 8 mm bolts at each end, running down into the uprights through drilled holes with nuts set into cross-holes, or with steel angle brackets bolted through both pieces. The crosshead is pushed upward every time you print, so these joints must be mechanical, never glue alone. When it is finished, the inside clearance from the bed to the underside of the crosshead should be about 250 mm.
Step 4: screw and handle
Run the screw down through the crosshead and its nut. At the top, fit the coupling nut and lock it with a second nut tightened hard against it, then drill through both the nut and the rod and fit a steel pin so they cannot unwind. Pass the handle bar through the hole in the coupling nut. The bottom end of the screw should be filed to a smooth, rounded dome so it can push the platen squarely even if it is very slightly off vertical.
Step 5: platen
Glue the two layers of platen plywood together and face the bottom with the hardboard or aluminium sheet. Sand the face flat on sandpaper laid on the glass sheet. Screw the steel plate to the centre of the top, and drill a shallow dimple in it for the screw's domed end. Trim the platen's ends so they run close against the inside faces of the uprights, with about 2 mm clearance each side, so it slides up and down without turning. Hang the platen from the screw with a loose collar: two washers and a nut on the screw above a steel strap screwed to the top of the platen, so turning the screw back lifts the platen, but the screw still turns freely against the dimple.
Step 6: check parallel
Turn the screw down until the platen just touches the bare bed. Slide strips of paper under the four corners; each should be held equally. If one corner is loose, shim the uprights' feet or plane the platen until it is even. This is the most important adjustment on the press.
Step 7: tympan and frisket
Cover the tympan frame with heavy drawing paper, stretched and glued tight. Hinge it to the back edge of the bed so it folds down over the forme. Hinge the frisket frame to the front edge of the tympan, cover it with thin card, and leave the window uncut until the first proof. Fix two small card tabs on the tympan sheet as guides for the paper's bottom and side edges; these give registration, so every sheet lands in the same place.
Step 8: chase
Screw a simple wooden frame of 20 × 20 mm strip to the bed to hold blocks in the same place every time, with one side free so a wooden wedge can be tapped in to lock the block. Mount lino on 12 or 18 mm plywood or MDF with glue so the block is rigid; keep every block for this press mounted to the same total height.
Step 9: carve a block
Draw the design on paper with a soft pencil. Lay the drawing face down on the block and rub the back so the graphite transfers, giving a mirror image. Check it in a mirror; any lettering must look backwards on the block. Ink in the areas to be kept with a marker. With the block on a bench hook, cut away everything that should stay white: first outline with a V gouge, then clear larger areas with a U gouge. Always push the tool away from your body and keep your other hand behind the blade. Cut slightly sloping shoulders under each raised line, never undercut, so the edges are strong. Clear large open areas deeply so the paper does not dip into them and pick up ink.
First proof: test and adjust
- Roll out ink. Squeeze a line of ink about 30 mm long onto the glass and roll it out with the brayer, back and forth in several directions, until the film is even and makes a soft hiss and a fine orange-peel texture. A thin layer is better than a thick one.
- Ink the block. Roll the brayer across the block in several directions with light pressure, re-inking from the slab two or three times.
- Load the paper. Lay a sheet on the tympan against the guides, add two sheets of packing paper behind it if the tympan is not already packed, and fold the frisket down. Fold tympan and frisket down onto the block and slide the bed in against the stop.
- Pull. Turn the handle down until the platen meets the paper, then give it a further firm part turn. Turn it back, slide the bed out, lift the tympan and peel the sheet away from the block slowly from one corner.
- Read the proof. Faint or patchy print usually means too little pressure or ink: add one sheet of packing, or roll the ink more thoroughly. Smudged, swollen edges mean too much ink or pressure. A faint patch in one place means that part of the block is low: glue a small piece of tissue paper on the packing sheet exactly behind it, an old printer's technique called make-ready. Ink on the margins means the frisket needs its window cut tighter.
- Cut the frisket. Once the position is right, cut the window in the frisket to just around the printing area.
- Print the run. Ink, load, pull, peel, repeat, setting each print on a line or rack to dry. Oil-based ink takes from a day to several days to dry, depending on the ink and the paper.
- Clean up. Scrape spare ink off the glass, wipe the brayer, glass and block with vegetable oil on a rag, then wash with dish soap and water. Clean before the ink skins over.
A simpler alternative: the lever press
If a threaded rod cannot be found, a lever press works on the same principle. Hinge a heavy flat board, the platen, to the back of the base, like a book cover. Fix a long bar along its top, extending well past the front. Place the inked block and paper under the platen, lower it and push down on the end of the bar; the bar's length multiplies your push. A strong hinge, a stiff platen and packing between platen and paper are all that matter. Even simpler, a print can be pulled with no press at all by laying the paper on the inked block and rubbing the back firmly with a wooden spoon or a flat pad, as East Asian printers did with woodblocks for more than a thousand years.
Safety
- Keep fingers out from under the platen. The screw and platen are a strong crushing machine. Load and unload paper only with the bed slid out.
- Cut away from yourself when carving. Lino and wood gouges slip easily; use a bench hook so the block cannot move, and keep the holding hand behind the blade.
- Oily rags can catch fire by themselves. Rags soaked in linseed oil, oil-based ink or the oils used for cleaning can heat up as they dry and ignite. Lay them out flat outdoors to dry, or keep them in a sealed metal can filled with water, and dispose of them safely.
- Use cleaning solvents only if needed, in a well-ventilated space, away from flames. Vegetable oil and soap clean most relief inks.
- Lead type is toxic. If you use old metal type, wash your hands after handling it, never eat, drink or smoke while working with it, and keep it away from children. Never melt type metal without proper ventilation and training.
- Check that the press is firmly bolted together before every session. A crosshead that breaks loose under load can fly upward.
- Keep the swing of the handle clear of faces and other people.
Where printing presses are used now
Most printing today is done by offset lithographic presses, digital presses and inkjet machines, which print newspapers, books, packaging and labels at enormous speed. But relief printing has never stopped. Letterpress studios still use iron hand presses and cylinder proof presses for wedding stationery, posters and fine books. Flexographic printing, a fast rotary form of relief printing with flexible rubber or polymer plates, prints much of the world's packaging, cardboard boxes and labels. Rubber stamps, embossing presses, and linocuts in schools and art studios all use the same idea. And presses of the same screw type are used for bookbinding, pressing cider and oil, and flattening paper. Wherever it appears, the rule is the same: ink a raised surface, lay the paper on it, press evenly.
Words to know
- Relief printing: printing from a raised surface that takes the ink.
- Platen: the flat plate that presses the paper onto the forme.
- Bed: the flat surface that holds the type or block.
- Type: individual raised letters or characters, cast in metal or cut in wood; one piece is a sort.
- Chase: the rigid frame in which type or blocks are locked.
- Furniture and quoins: the spacers and wedges that fill and lock a chase.
- Forme: the locked-up chase with its type or blocks, ready to print.
- Tympan: the hinged frame that carries the paper and packing.
- Frisket: the hinged mask that holds the sheet and protects the margins.
- Brayer: a hand roller for spreading ink.
- Registration: placing every sheet, or every colour, in exactly the same position.
Related in the Knowledge Ark
The Knowledge Ark keeps 6,000 packages for rebuilding, from papermaking and ink to records, measuring and teaching. Browse them, search by category and open any package at the Knowledge Ark. Its sister, the Culture Ark, keeps 2,000 things people should still be able to see in 2,000 years.
Where to learn more
- British Library, London: the Diamond Sutra of 868 and its digitised scroll.
- Bibliothèque nationale de France, Paris: the surviving volume of the Jikji, and Cheongju Early Printing Museum, Korea.
- Gutenberg Museum, Mainz: Gutenberg's methods, reconstructed presses and copies of the 42-line Bible.
- St Bride Library, London, and letterpress studios and museums of printing worldwide: iron hand presses, type and hands-on printing.
- Any introductory guide to relief printmaking and letterpress covering carving, inking, packing and make-ready.
Knowledge Ark build sheet. An Artificial Mind Hive (AMH) project. AMH is owned by Austin Little.

Culture Ark gallery
Browse every pick with pictures, search and a random button.
Open the gallery →