Knowledge Ark build sheet · Knowledge Ark · Culture Ark · An Artificial Mind Hive project by Austin Little
A kiln is a chamber that holds heat. Put shaped clay inside, raise the temperature slowly to somewhere between about 600 and 1,300 °C, and the soft earth turns permanently into ceramic: hard, durable and, at high enough temperatures, watertight. Pots, bricks, roof tiles, drainpipes, lamps, storage jars and the first figurines all came from this one change. This sheet explains where firing clay came from, what happens to clay as it heats, what each part of a kiln does, and how to fire pots in a simple pit and in a small wood- or charcoal-fired updraft kiln built of brick or cob. Everything here is meant to be rebuilt from scratch if it ever had to be.
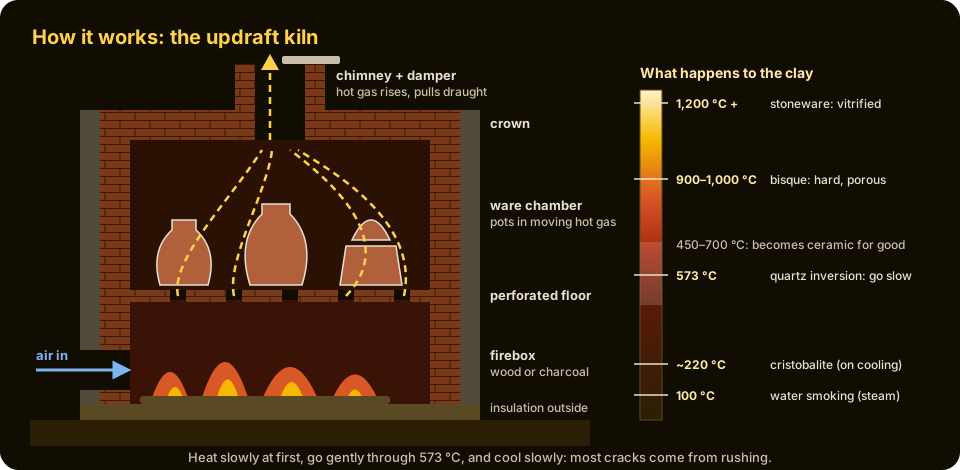
The updraft. Fuel burns in the firebox at the bottom. Hot gases rise through a perforated floor, pass around the pots in the chamber and escape up the chimney. The rising hot column pulls fresh air in through the firebox door, so a taller, hotter chimney draws harder. The scale on the right shows what happens to the clay as the temperature climbs.
Why keep this in the Knowledge Ark
Ceramics are one of humanity's oldest and most useful technologies. Fired clay vessels made it possible to cook liquids directly over a fire, store grain safely from rodents and damp, ferment drinks, carry water and keep oil. Fired bricks and tiles built cities. Clay crucibles and furnace linings made metalworking possible, and kilns were the first places people learned to control very high temperatures for hours at a time. Clay is found almost everywhere, and wood, charcoal, dung and plant waste can all fire it. Knowing how to dig, prepare, shape and fire clay is knowing how to make containers, building materials and tools from the ground underfoot, with no factory at all.
History: how it came about
About 26,000 years ago: the first fired clay figures
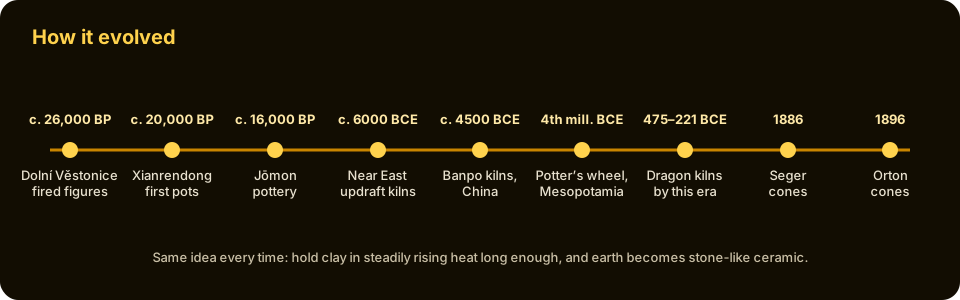
The oldest known fired clay objects are not pots but figures. At Dolní Věstonice in what is now the Czech Republic, people of the Gravettian culture, hunters of mammoth and other large game, modelled animals and human figures from local loess soil mixed with water and fired them in hearths. The best known, a small female figure now called the Venus of Dolní Věstonice, was found in 1925. Radiocarbon dates from the site cluster around 26,000 years before present (calibrated calendar dates are somewhat older). Thousands of fired clay fragments were found there, along with what appear to be simple kiln-like hearths. Studies of the fragments in the late 1980s found that many had cracked from thermal shock, and some researchers have suggested the figures may have been made wet and placed in the fire on purpose to shatter, perhaps as part of a ritual. Whatever the reason, these people knew that fire turns clay into a lasting material, but they did not use it for containers.
About 20,000 years ago: the first pots
The oldest known pottery vessels come from East Asia. Fragments from Xianrendong Cave in Jiangxi Province, southern China, have been dated to about 20,000 years ago, during the last Ice Age, long before farming. In Japan, the people of the Jōmon culture made pottery from about 16,000 years ago; fragments from the Ōdai Yamamoto I site in Aomori Prefecture are among the oldest. "Jōmon" means "cord-marked", after the patterns pressed into the clay with twisted cords, a name taken from the zoologist Edward S. Morse's 1877 description of pottery from the Ōmori shell mound near Tokyo. Over thousands of years Jōmon potters made deep cooking pots, and later elaborate vessels with flame-like rims. Pottery in eastern Russia and North Africa also appeared early and independently. These first pots were fired in open fires or shallow pits, at temperatures probably in the region of 600 to 900 °C.
From open fire to kiln
An open fire or pit loses most of its heat to the air and heats pots unevenly. The kiln's advantage is simple: enclose the fire and the pots, and send the heat past the pots before it escapes. In Mesopotamia and neighbouring regions of the Near East, potters were building two-level updraft kilns, with a firebox below a perforated clay floor and the pots above, by about the sixth millennium BCE. Such kilns reach higher and more even temperatures and use fuel far more efficiently. The potter's wheel appeared in Mesopotamia during the fourth millennium BCE, letting potters make thin, even, round vessels quickly. Fired bricks, glazed tiles and cuneiform tablets baked hard for permanence all came from the same kiln technology.
China: updraft kilns, dragon kilns and stoneware
In China, kilns were found at Banpo near Xi'an, a village of the Yangshao culture dated to roughly 4800–4300 BCE, where potters fired painted red pottery in updraft kilns. Over the following millennia Chinese potters pushed temperatures higher than anyone else. By the Shang dynasty in the second millennium BCE, kilns in southern China were firing high-temperature glazed stoneware, often called proto-porcelain, above 1,150 °C.
The dragon kiln (longyao) was one of the great advances. It is a long, sloping tunnel built up a hillside, with a firebox at the lower end and stoking holes along the sides. Heat flowing up the slope preheats the pots ahead of the fire, and the potters move the firing gradually uphill, feeding wood through the side holes. Dragon kilns were in use in southern China by the Warring States period (475–221 BCE) and remained in use for more than two thousand years; some of the largest exceeded a hundred metres in length and held tens of thousands of pieces in one firing. Such kilns produced the celadon and other stonewares of the Song dynasty and helped lead to true porcelain, fired at around 1,300 °C. The design spread to Korea and Japan, where the single-chamber anagama and later the multi-chambered climbing kiln (noborigama) became central to ceramic traditions.
Measuring heat: colour and cones
For most of history potters judged temperature by eye, from the colour of the glow inside the kiln, and by "draw rings" or test pieces pulled out with a hook. In 1886 the German ceramic chemist Hermann Seger published a system of small slender pyramids made of carefully proportioned clay and flux mixtures, each designed to soften and bend at a particular point. These pyrometric cones measure the combined effect of temperature and time, called heat work, which is what actually matures clay and glaze. In the United States, Edward Orton Jr. began manufacturing cones in 1896; Orton cone numbers are still used worldwide. Thermocouples and electronic pyrometers came later, but cones remain standard because they respond to heat in the same way as the pots.
How it works
What clay is
Clay forms when rocks such as granite and feldspar weather slowly over thousands of years. Its main minerals are very fine, flat, plate-like particles of hydrated aluminium silicate; the purest is kaolinite, Al₂Si₂O₅(OH)₄. Water between the tiny plates lets them slide over each other, which is why wet clay is plastic and holds a shape. Most natural clays also contain quartz sand, iron oxides (which turn fired clay red, brown or buff), mica, feldspar, organic matter and lime.
Stage 1: drying
A newly made pot contains a lot of water. As it dries, the particles move closer together and the pot shrinks, usually several percent in each direction. It passes through leather-hard (firm but still damp) to bone-dry (pale and room temperature to the touch). Drying must be slow and even, out of direct sun and wind, or one part shrinks before another and the pot cracks. Even a pot that feels bone-dry still holds some water in its pores.
Stage 2: water smoking, up to about 200 °C
When firing begins, that remaining pore water turns to steam. If the temperature rises too fast, steam forms faster than it can escape through the clay and the pot can burst, sometimes violently. This stage is called water smoking because a faint steam may be seen leaving the kiln. Potters keep the temperature low, below about 100 to 120 °C at first, for hours, then rise slowly to about 200 °C. Thick pieces need even more time.
Stage 3: burning out and losing chemical water, about 300–800 °C
Between roughly 300 and 800 °C, organic matter and carbon in the clay burn away; the kiln needs plenty of air for this. Between about 450 and 700 °C the clay loses the water that is chemically bound inside its crystals as hydroxyl groups. Kaolinite becomes a new, disordered material called metakaolin. This change is permanent: after it, the clay can no longer be softened with water. This is the moment clay becomes ceramic. Pots fired only this far, in a pit or open fire, are hard but porous and fairly weak.
The quartz inversion at 573 °C
Quartz sand in the clay changes its crystal form suddenly at 573 °C, from the low-temperature alpha form to the high-temperature beta form, with a small but sudden change in size. It happens on heating and again, in reverse, on cooling. If one part of a pot passes 573 °C while another part has not, the stress can crack it. Firing slowly through this point, and above all cooling slowly through it, avoids "dunting" cracks. A second, similar change in cristobalite, a form of silica that can develop in clays fired to high temperatures, happens around 220 °C on cooling.
Stage 4: sintering and bisque, about 900–1,000 °C
As the temperature rises above roughly 800 °C, the particles begin to stick together at their points of contact, a process called sintering, and the pot gets stronger. A bisque (biscuit) firing, often around 900 to 1,000 °C, makes pots hard enough to handle and glaze but still porous enough to absorb glaze. Most traditional earthenware, including terracotta flowerpots and bricks, is fired between about 900 and 1,150 °C. It remains somewhat porous unless glazed.
Stage 5: vitrification, 1,200 °C and above
At higher temperatures, fluxes in the clay (such as feldspar, iron and lime) begin to melt and form glass that flows into the pores and binds the particles. This is vitrification. Stoneware is fired to about 1,200 to 1,300 °C and becomes dense, strong and nearly watertight even without glaze. Porcelain, made from white kaolin-rich clay with feldspar and quartz, is fired to around 1,250 to 1,400 °C and becomes hard, white and, if thin, translucent. Every clay has a limit: fired too high, it slumps, bloats or melts. A clay body must be matched to its firing temperature.
Judging temperature by colour and cones
Glowing colour gives a rough guide, best judged in dim light: the first dull red glow appears at around 500 to 600 °C; a cherry red at roughly 750 to 850 °C; bright orange at around 900 to 1,000 °C; yellow around 1,100 °C; and yellow-white at 1,200 °C and above. Different eyes and lighting give different readings, so colour alone is only a guide. Pyrometric cones are far more reliable: a set of three cones (one below, one at and one above the target) set in a pad of clay behind a spy hole shows when the target has been reached as the middle cone bends over. Roughly, cone 010 bends near 900 °C, cone 06 near 1,000 °C, cone 04 near 1,060 °C, and cone 6 near 1,220 °C, varying with the heating rate.
Why an updraft kiln draws
Hot gas is lighter than cold air, so it rises. In an updraft kiln, the fire sits under the chamber and the chimney sits on top. The rising column of hot gas in the chimney lowers the pressure inside the kiln, pulling fresh air in through the firebox door. More air means a hotter fire, which means stronger draught. A taller chimney draws harder. A damper (a sliding brick or plate over the flue) and the size of the air inlet control how fast the fire burns and whether the atmosphere is oxidising (plenty of air, bright colours) or reducing (less air, smoky flames, darker and different colours in iron-bearing clays and glazes).
Why insulation matters
Kiln walls lose heat from their outer surface. Dense brick stores a great deal of heat and conducts it well, so it takes much fuel to warm up. Lighter, porous materials such as insulating firebrick, or clay mixed with sawdust, rice husks or crushed charcoal that burn out to leave air pockets, slow the loss of heat. A common good design uses dense refractory brick on the inside, where flames touch, and an insulating layer outside.
Parts and what each one does
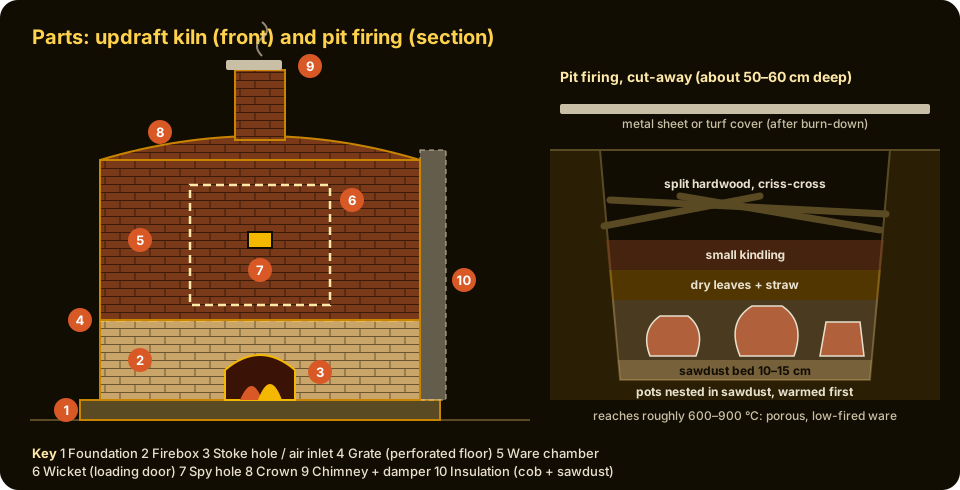
- Foundation. A level base of compacted gravel, stone or bricks laid on the ground, which keeps damp out and supports the weight of the kiln.
- Firebox. The lower chamber where fuel burns. It needs the toughest, most heat-resistant bricks, because it takes direct flame and abrasion from stoking.
- Stoke hole and air inlet. The opening where fuel is fed and air enters. A brick or metal door with a gap controls the air.
- Grate or perforated floor. A floor of bricks laid with gaps, or a clay slab with holes, that holds the pots above the fire and lets hot gases rise evenly through.
- Ware chamber. The space where pots are stacked. Its walls must withstand the firing temperature and hold heat.
- Wicket (loading door). A doorway that is bricked up loosely after loading and opened again after cooling.
- Spy hole. A small opening, plugged with a loose brick, for watching cones and the glow of the fire.
- Crown or roof. An arch, dome or lid of bricks or kiln shelves that closes the top of the chamber, with the flue opening in it.
- Chimney (flue) and damper. A stack that creates the draught; a sliding brick or plate across it adjusts the pull.
- Insulation. An outer layer of insulating brick, or cob mixed with sawdust or straw, that keeps heat in.
Build it: pit firing and a small updraft kiln
Start with a pit firing. It needs no building at all and teaches drying, slow heating and how fire behaves with clay. Then build the small updraft kiln, which reaches bisque and earthenware temperatures (about 900 to 1,050 °C) with dry wood or charcoal. Stoneware temperatures above 1,200 °C are possible only with a larger, well-insulated kiln, a strong draught and skilled stoking; do not expect them from a first small kiln.
Materials
- Clay: dug local clay, cleaned of stones and roots, or bought earthenware clay. Many dug clays crack in firing unless mixed with 10 to 30 percent "grog" (crushed fired clay) or sharp sand, which opens the body and helps steam escape.
- For pit firing: a spade, sawdust or wood shavings, dry leaves, straw, small kindling and split dry hardwood, and a sheet of corrugated metal or a supply of turf to cover the pit.
- For the kiln: about 150 to 250 bricks, depending on size. Use hard (dense) firebricks for the firebox and inner chamber if you can; common red clay building bricks can serve for the outer walls and chimney at earthenware temperatures. Avoid concrete blocks and concrete-based bricks, which crack and can spall in high heat.
- Mortar: a mix of clay and sand (roughly one part clay to two or three parts sand by volume) with water, or a purchased refractory mortar. Portland cement mortar breaks down at kiln temperatures and should not be used inside.
- Cob for insulation: clay, sand, straw and sawdust or rice husk, mixed with water.
- Kiln shelves or extra bricks to make the grate, a metal plate or brick for the damper, and a long metal pipe or a brick stack for the chimney.
- Fuel: a large stack of dry split hardwood, kept under cover for months; charcoal works well for small kilns and gives a steady heat.
- Cones: a few pyrometric cones (for example cone 010, 08 and 06) and a little clay to stand them in, if available.
Tools
Spade, trowel, bucket, spirit level, string line, brick hammer or chisel, wheelbarrow, metal poker or rake, heavy leather gloves, safety glasses, a respirator for dust, a hose or water barrels, and a bucket of sand.
Step 1: make and dry the pots
Wedge (knead) the clay to remove air pockets, which can expand in the fire. Shape pots by pinching, coiling or slab building, keeping walls an even thickness of about 6 to 10 mm. Dry them slowly in the shade for at least one to two weeks, longer in humid weather, turning them so all sides dry. A pot is ready when it is pale, light and no longer feels cool against your cheek.
Step 2: pit firing
Choose a clear, open site away from buildings, trees and dry grass, and check local fire rules. Dig a pit about 50 to 60 cm deep and 80 to 100 cm across. Line the bottom with 10 to 15 cm of sawdust or shavings. Warm the pots near a small fire for an hour or two first to drive off the last moisture. Nest the pots on the sawdust, filled with and surrounded by more sawdust, then cover with dry leaves and straw, then small kindling, then larger split wood laid over the top in a criss-cross. Light from several points on the windward side. Let it burn down, add more wood to keep a thick bed of embers, then cover the pit loosely with metal sheet or turf to slow the burning and let it smoulder for many hours, ideally overnight. Pit firing typically reaches around 600 to 900 °C, enough to make pots ceramic. The smoke blackens and colours the surfaces in patches, which many potters prize. Pit-fired pots are porous; they suit decoration, planters, storage of dry goods and lamps, but they leak water slowly and should not be used for food unless you know the clay and have tested it.
Step 3: choose and prepare the kiln site
For the brick kiln, choose a level, open site with the same clearances as the pit, and where prevailing winds will carry smoke away from homes. Mark out a square of about 1 metre by 1 metre for a small kiln. Dig away topsoil and lay a foundation of compacted gravel and a course or two of bricks, checking it is level.
Step 4: build the firebox
Lay the firebox walls on the foundation, about 40 to 50 cm high, leaving an opening at the front about 25 cm wide and 25 cm high for the stoke hole and air inlet. Use firebricks on the inside face if you have them. Set each brick in a thin layer of clay-sand mortar, staggering the joints like a wall.
Step 5: lay the grate
Across the top of the firebox, lay firebricks or kiln shelves on edge with gaps of 2 to 4 cm between them, or lay a thick clay-and-grog slab with many finger-sized holes and let it dry. This floor must be strong: it carries the whole load of pots. Spread the gaps evenly so heat rises evenly through the chamber.
Step 6: build the chamber and wicket
Build the chamber walls up from the edges of the grate, about 60 to 70 cm high, for an inside space of roughly 50 × 50 × 60 cm. Leave a wicket opening in one side for loading; you will close it with loosely stacked bricks for each firing. Leave a spy hole one brick high near the middle of the wicket or opposite wall.
Step 7: crown and chimney
Close the top with bricks laid across on metal bars (which will eventually corrode; replace them as needed), a corbelled arch, or kiln shelves, leaving a central opening about 15 to 20 cm square. Build a chimney stack of bricks or set a metal pipe at least 1 to 1.5 metres high over that opening. A taller chimney gives a stronger draught. Rest a sliding brick or metal plate on top of the flue as a damper.
Step 8: insulate and cure
Pack the outside of the chamber walls and crown with a 10 to 15 cm layer of cob mixed with plenty of sawdust or straw, and let everything dry for one to two weeks under cover. Then light a small curing fire for several hours to drive moisture out of the mortar and cob before the first full firing. Expect some cracks; fill them with more clay mortar.
First firing: test and adjust
- Load carefully. Set dry pots on the grate on small pieces of brick, with gaps for the flames to move around them; pots can touch each other in a bisque firing. Place cones in a clay pad where they can be seen through the spy hole. Close the wicket with bricks, leaving small gaps at first.
- Warm slowly. Light a small fire at the mouth of the firebox, not deep inside. Keep it gentle for two to four hours, the water-smoking stage. Hold a cold piece of metal or glass over the chimney; if it fogs with moisture, the pots are still giving off water. Keep the heat low until it stops fogging.
- Climb steadily. Push the fire deeper and add more fuel little by little, aiming for roughly 100 °C per hour. Take extra care between about 500 and 600 °C, around the quartz inversion. Watch for the first dull red glow through the spy hole.
- Stoke for heat. Once the glow is cherry red, feed split dry wood in small amounts often, rather than large loads. Each load will produce a burst of smoke and flame from the chimney, then clear. If the fire smokes heavily and the temperature stalls, it needs more air: open the stoke hole or damper slightly.
- Reach the target. Watch the cones; when the target cone bends to the level of its base, or when the inside has held an even bright orange for at least half an hour to an hour, the bisque is done. Firing a small kiln to bisque typically takes from about six to twelve hours.
- Cool slowly. Stop stoking, close the stoke hole and damper, and seal gaps with clay so cold air cannot rush in. Leave the kiln to cool for at least as long as the firing took, preferably overnight or a full day. Opening it too early cracks pots as they pass 573 °C on the way down.
- Judge the result. A well-fired earthenware pot rings with a clear note when tapped lightly; a dull clunk may mean a crack or underfiring. A pot that crumbles or softens in water was not fired hot enough. Pots that shattered into pieces usually held too much moisture or were heated too fast at the start. Note what you did and adjust for the next firing.
Safety
- Burns. Kiln walls, chimneys, pots and tools stay dangerously hot for many hours after a firing. Wear heavy leather gloves and closed leather shoes, use long-handled tools, and wear natural-fibre clothing such as cotton or wool; synthetic fabrics can melt onto skin. Keep water, sand and a fire extinguisher at hand. Treat burns with cool running water for at least 20 minutes and get medical help for serious ones.
- Carbon monoxide. Fires starved of air make carbon monoxide, a colourless, odourless gas that can kill. Fire kilns outdoors only, never in a garage, shed, tent, basement or any enclosed or partly enclosed space, and stay upwind of the chimney. Headache, dizziness, nausea and confusion near a kiln are warnings: move to fresh air immediately.
- Silica dust. Dry clay, glaze materials and swept-up kiln dust contain fine crystalline silica, which causes silicosis, an incurable lung disease, as well as other lung damage. Never sweep dry clay dust. Clean up with water and a damp sponge or mop, work wet where possible, and wear a well-fitted respirator rated for fine dust (such as P100 or FFP3) when mixing dry clay or handling old kiln linings and insulation.
- Eyes. Looking into a hot kiln exposes the eyes to intense infrared light and heat. Look through spy holes only briefly, with suitable shaded or infrared-filtering glasses, and stand to one side when opening a spy hole, as flame can blow out.
- Exploding pieces. Damp pots, damp bricks and wet stones, especially river stones, can burst in a fire. Never use river stones in a fire pit or kiln, dry everything thoroughly, and keep spectators back at least a few metres, wearing safety glasses.
- Fire spread. Fire kilns only on calm days on cleared, non-flammable ground, well away from buildings, fences, trees and dry grass; obey local burn bans. Never leave a firing unattended, and make sure all embers are out before leaving after cooling.
- Glazes. Do not use lead-based glazes for anything that will hold food or drink. Lead and some other glaze metals, such as cadmium and barium, are toxic; use only well-tested food-safe glazes for tableware.
- Lift bricks and kiln shelves with bent knees, and wear safety glasses when cutting or breaking bricks. Keep children well back from the kiln at all times.
Where kilns are used now
Kilns are still everywhere. Brick and tile works use huge tunnel kilns hundreds of metres long, in which ware rides slowly on cars through a fixed fire zone, a descendant of the climbing kiln. Cement kilns, long rotating steel tubes, heat limestone and clay to around 1,450 °C to make the clinker for Portland cement, the most-used construction material on Earth. Factories fire sanitary ware, tableware, electrical insulators, spark plugs and the ceramic parts of electronics. Studio potters use electric and gas kilns, and many still build and fire wood kilns, from small updrafts to anagama and noborigama that take days to fire. Pit and bonfire firing are still practised in many countries, as they have been for more than ten thousand years.
Words to know
- Bisque (biscuit): pottery fired once, without glaze, to make it hard enough to handle.
- Earthenware / stoneware / porcelain: ceramics fired roughly at 900–1,150 °C, 1,200–1,300 °C, and 1,250–1,400 °C respectively.
- Grog: crushed, already-fired clay added to raw clay to reduce shrinkage and cracking.
- Leather-hard / bone-dry: stages of drying, from firm but damp to fully air-dry.
- Quartz inversion: the sudden change in quartz at 573 °C that can crack pots heated or cooled too fast.
- Vitrification: melting of fluxes into glass that fills pores and makes clay dense and watertight.
- Pyrometric cone: a small clay pyramid that bends at a set amount of heat work.
- Updraft / downdraft: kilns in which hot gases leave at the top, or are drawn back down and out at the bottom.
- Oxidation / reduction: firing with plenty of air, or with too little air, which changes clay and glaze colours.
Related in the Knowledge Ark
The Knowledge Ark keeps 6,000 packages for rebuilding, from measuring and optics to records and navigation. Browse them, search by category and open any package at the Knowledge Ark. Its sister, the Culture Ark, keeps 2,000 things people should still be able to see in 2,000 years.
Where to learn more
- The Moravian Museum, Brno: finds from Dolní Věstonice, including the Venus figure.
- The British Museum, the Palace Museum in Beijing and the Tokyo National Museum: early pottery from Mesopotamia, China and the Jōmon culture.
- The Edward Orton Jr. Ceramic Foundation: pyrometric cone charts and firing guidance.
- Health and safety agencies' guidance on crystalline silica dust and carbon monoxide.
- Any introductory ceramics textbook covering clay bodies, firing stages and kiln design.
Knowledge Ark build sheet. An Artificial Mind Hive (AMH) project. AMH is owned by Austin Little.

Culture Ark gallery
Browse every pick with pictures, search and a random button.
Open the gallery →